– Understanding the Basics of Contouring and Highlighting
Mastering the art of contouring and highlighting is a skill that requires a good understanding of the basics. When it comes to makeup application, hand care is an often overlooked aspect that can greatly impact the final result. Properly cared for hands can make all the difference when it comes to achieving flawless contouring and highlighting. Taking the time to moisturize, exfoliate, and protect the hands can ensure a smooth application and blending of contour and highlight products. Additionally, well-maintained hands can provide the dexterity and precision required for intricate makeup techniques. By incorporating a dedicated hand care routine into your overall beauty regimen, you can elevate your contouring and highlighting skills to the next level.
When it comes to mastering the art of contouring and highlighting, understanding the basics is crucial for achieving a flawless look. Proper hand care is an often overlooked aspect that can greatly impact the final result.
– Understanding the Basics of Contouring and Highlighting
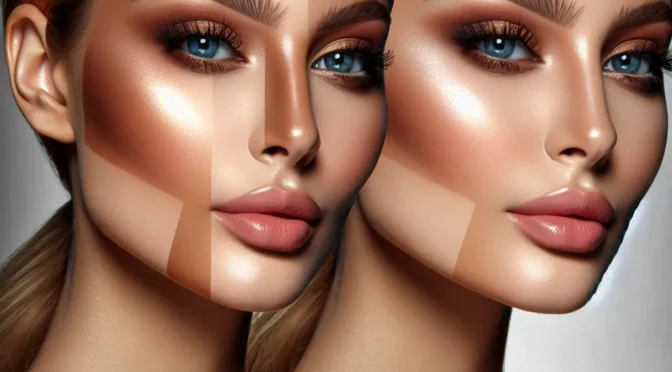
Understanding the basics of contouring and highlighting is essential for mastering the art of enhancing your facial features. Contouring involves using a darker shade to create shadows and add definition, while highlighting uses a lighter shade to bring forward specific areas of your face. These techniques work together to sculpt the face and create a more dimensional look.
When contouring, it’s important to select a matte product that is a few shades darker than your natural skin tone. Common areas to contour include the hollows of the cheeks, the jawline, and the sides of the nose. On the other hand, highlighting is done with a product that is a few shades lighter than your skin tone and is typically applied to the high points of the face, such as the tops of the cheekbones, the bridge of the nose, and the brow bone.
Understanding your face shape is crucial for effective contouring and highlighting. Different face shapes may require different techniques and placements of contour and highlight. For example, those with a round face may want to focus on elongating the face with contour along the jawline, while those with a square face may want to soften the angles with highlight on the forehead and chin.
By mastering the basics of contouring and highlighting, you can create a beautifully sculpted and radiant look that enhances your natural beauty.
– Tools and Techniques for Perfecting Your Contour and Highlight
Mastering the art of contouring and highlighting requires the right tools and techniques to enhance your facial features and achieve a flawless makeup look. To perfect your contour and highlight, it’s essential to have the proper tools at your disposal. A combination of brushes, sponges, and contouring palettes are essential for achieving precise and seamless results.
The first step in achieving the perfect contour is selecting the right shade of contour powder or cream to create natural-looking shadows. A cool-toned matte bronzer or contour powder works best for mimicking shadows on the face. Using an angled contour brush, apply the product to the hollows of the cheeks, temples, and along the jawline to sculpt and define your features.
When it comes to highlighting, a creamy or powder highlighter that complements your skin tone is ideal. A small, fluffy highlighting brush can be used to apply the product to the high points of the face, including the tops of the cheekbones, bridge of the nose, brow bone, and cupid’s bow. This will add luminosity and a healthy glow to the skin.
Blending is key to achieving a natural-looking contour and highlight. Utilize a damp makeup sponge or a blending brush to seamlessly blend the contour and highlight products into the skin, ensuring there are no harsh lines or uneven patches. The end goal is to create a soft transition between the contoured areas and the highlighted areas for a flawless finish.
Experiment with different tools and techniques to discover what works best for your unique facial features. With the right tools and the knowledge of proper techniques, you can master the art of contouring and highlighting to elevate your makeup game to the next level.
– Contouring and Highlighting for Different Face Shapes
Mastering the art of contouring and highlighting is a game-changer in the world of makeup. One key aspect to consider is contouring and highlighting for different face shapes. Not all faces are created equal, and understanding how to sculpt and define each unique shape can be a makeup game-changer. Let’s dive into some tailored techniques for different face shapes.
For a round face shape, the goal is to create more definition and structure. Focus on contouring the sides of the forehead and the area below the cheekbones to add shadows and create the illusion of angles. Highlight the center of the forehead, the bridge of the nose, and the high points of the cheeks to draw light to the center of the face.
On the other hand, for those with a square face shape, the aim is to soften the angles. Contour along the outer edges of the face, including the jawline, to add warmth and softness. Highlight the center of the forehead and the chin to bring balance and draw attention to the middle of the face.
Individuals with a heart-shaped face can benefit from contouring the temples and the sides of the forehead to minimize the width of the top of the face. Adding contour along the jawline can also help balance the prominent forehead. Highlight the center of the forehead and the cheekbones to accentuate the eyes and create symmetry.
For those with an oval face shape, a more balanced approach is suitable. Focus on subtle contouring below the cheekbones and along the jawline to enhance natural bone structure. Highlight the center of the forehead, the bridge of the nose, and the cheekbones to accentuate the natural symmetry.
Understanding how to contour and highlight according to different face shapes is essential for achieving a personalized and flattering makeup look. By tailoring these techniques to individual features, one can accentuate their natural beauty and create a stunning, sculpted finish.
– Advanced Tips and Tricks for a Flawless Contour and Highlight
Mastering the art of contouring and highlighting can elevate your makeup game to the next level, but achieving a flawless look requires advanced techniques and tricks. To ensure a seamless contour and highlight, start by choosing the right products for your skin type and undertone. Cream contour products are perfect for achieving a natural, skin-like finish, while powder products work well for oily skin types and offer a more matte effect.
When contouring, remember that less is more. It’s easier to build up the product gradually than to blend out a harsh line. Place the contour shade in the hollows of your cheeks, along the hairline, and under the jawline to create dimension. For a natural and lifted effect, blend the product upwards rather than downwards.
For a flawless highlight, opt for a shade that complements your skin tone. Champagne tones work well for light to medium skin, while golden tones flatter deeper skin tones. Apply the highlighter to the high points of your face, such as the tops of your cheekbones, the bridge of your nose, and the cupid’s bow. To avoid a patchy application, ensure your base makeup is well-set before applying any powder highlight.
Blending is key to achieving a seamless contour and highlight. Use a damp makeup sponge or a duo-fiber brush to blend out the product, ensuring there are no harsh lines. Additionally, using a translucent setting powder to further blend the contour and highlight can help to meld the products with your natural skin texture.
Finally, don’t underestimate the power of proper lighting. Natural light provides the most accurate reflection of your makeup, so try to perfect your contour and highlight in daylight if possible. Alternatively, investing in a well-lit makeup mirror can also make a world of difference in achieving a flawless finish.